
"Have I gone mad?"
"I'm afraid so. You're entirely bonkers. But I'll tell you a secret. All the best people are."
"I'm afraid so. You're entirely bonkers. But I'll tell you a secret. All the best people are."
My soon to be 5-year-old has decided that for her first big birthday party with friends, she'd like to throw a Mad Hatter Tea Party. I may have had a little to do with her decision (getting to re-use some old Wonderland props) but she's loving the idea and is keen to tell anyone who will listen.
And since this time, boys will be invited, I'm taking a new approach so that all of the kids will have a great time. I'll share those ideas in later posts.
But, I thought I would go ahead and share a tutorial on the invitations I made for the event. I think they turned out super cute!
Supplies:

- Various Printed/Colored Cardstock
- White Cardstock
- Feathers
- Tape
- Glue
- Scissors
- 10/6 Cutouts

- Template (fit to an 8.5 x11 cardstock page)


Steps:
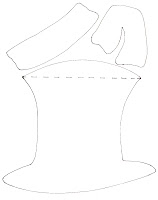
- There are two versions of the hat. The first version is the one I did, with the hat flipping up to reveal the invite information. The second version is to create the hat without the flap and use the back of the 10/6 card to display the invite information. Just be sure you don't glue the 10/6 card to the hat so that it can be taken out of the hat sash and turned over.
- First, print out the template onto cardstock and cut out the pieces to use for tracing. The dotted line on the hat indicates where you'll need to flip it up and trace the mirror image of the hat to create the flap. If you're doing version two, disregard the dotted line.
- Trace the hat and sash pieces on your pretty cardstock and be sure to flip the front sash piece over and trace to create a mirror image for the back. Cut out all pieces.
- Print the 10/6 document onto cardstock and cut out. Also, print out your invitation information on cardstock paper so it measures 4x4.5". I was able to fit four invites to an 8.5x11" page.
- (Ignore if doing version two) Fold top of hat down and trim any overlapping edges. Glue invitation to inside.
- Tape the feathers onto the hat and glue the 10/6 card. Then glue the front sash on top. If doing version two, don't glue the 10/6 card and be sure you leave an unglued gap in the sash.
- Turn over and glue the back of the V shaped sash so it's under the back sash.
- Voila'! Super cute invitations for the maddest of hatters.

No comments:
Post a Comment
We love comments! Please let us know you stopped by.